

Part 1: Navigate to Explorer
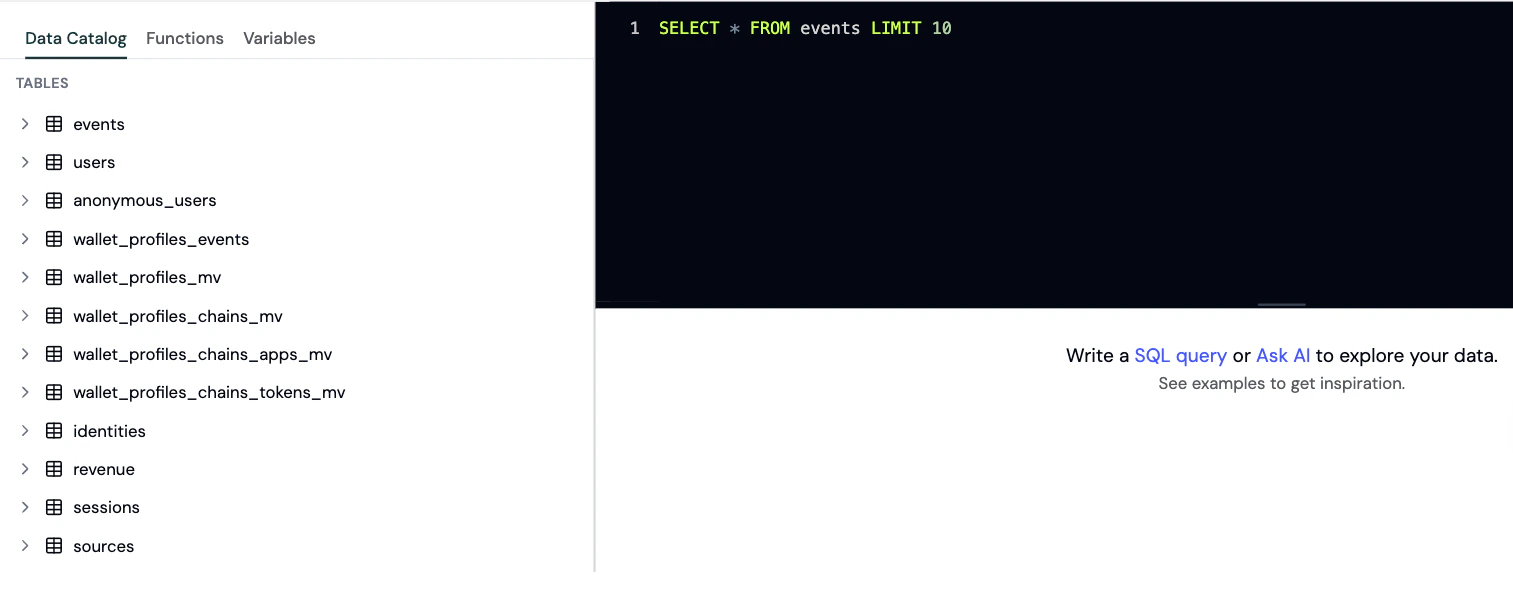
Click Explorer in the sidebar and select Data. You’ll see:- Left panel: Schema browser with tables and columns
- Center panel: SQL editor with syntax highlighting
- Bottom panel: Results table with pagination and export options
- Examples: Working SQL examples you can modify to fit your use case
- Tools: Explain Query, an AI SQL generator, and Format SQL help you iterate faster
Part 2: Browse the Schema
The schema browser shows every table in your project. See the Data Catalog for the full list; the three most commonly used are:events
All tracked events (page views, contract events, custom events) Key columns:timestamp: When event occurred (DateTime)type: Event category (LowCardinality String): ‘page’, ‘connect’, ‘transaction’, ‘decoded_log’, ‘track’, etc.event: Specific event name for ‘track’ and ‘decoded_log’ types (e.g., ‘swap’, ‘Transfer’)session_id: User’s session identifieranonymous_id: Anonymous user ID (for unconnected wallets)address: Connected wallet address (null if not connected)page_path: Page path (e.g.,/swap)page_url: Full page URLpage_title: Page titlereferrer: Referrer headerreferrer_url: Referrer URLutm_source,utm_medium,utm_campaign: Attribution dataproperties: JSON string with event-specific data (chain_id, tx_hash, etc. stored here)volume,revenue,points: Float32 columns extracted frompropertiesat ingest (values >100M zeroed as anomalies). Query these flat columns rather thanJSONExtractFloat(properties, ...)location: Country/geo (LowCardinality String)device: Device type (LowCardinality String)browser: Browser name (LowCardinality String)
users
Identified users (wallet addresses with aggregate data) Key columns:address: Primary key (wallet address)first_seen: First activity timestamp (SimpleAggregateFunction)last_seen: Most recent activity (SimpleAggregateFunction)num_sessions: Total sessions (AggregateFunction - access viauniqMerge(num_sessions))revenue: Total revenue (SimpleAggregateFunction sum)volume: Total volume (SimpleAggregateFunction sum)points: Total points (SimpleAggregateFunction sum)activity_dates: Lifecycle calculation data (AggregateFunction)first_utm_source,last_utm_source, etc.: Attribution (AggregateFunction - access via argMinMerge/argMaxMerge)
anonymous_users
Unidentified users (visitors who haven’t connected wallets) Key columns:anonymous_id: Primary keyfirst_seen,last_seen: Activity timestampsnum_sessions: Total sessions (AggregateFunction - access viauniqMerge(num_sessions))
Part 3: Write Your First Query
Start simple. Click on theevents table in the schema, then click the timestamp column to insert it.
Write a basic query:
count(*): Total rowscount(DISTINCT column): Unique valuesINTERVAL 7 DAY: Time spanWHERE: Filter rowsGROUP BY: Aggregate by columnORDER BY: Sort results
Part 4: 10 Essential Queries
Query 1: Daily Active Users
How many unique users per day?Query 2: Top Pages by Visits
Which pages drive the most traffic?Query 3: Wallet Connect Rate
What % of visitors connect a wallet?Query 4: Transaction Volume by Day
How much onchain activity (by event count)?Query 5: Users by Referral Source
Where do your best users come from?Query 6: Average Sessions Before First Transaction
How many visits before users buy?Query 7: Bucket users by session frequency
Group users into simple tiers by how many sessions they’ve had.Query 8: Whale Analysis
Which wallet addresses have the highest volume?wallet_profiles_labels table, not in the users table.
Query 9: Volume by UTM Campaign
Which campaigns drive the most onchain volume?Query 10: Hourly Activity Heatmap
When are your users most active?Part 5: Visualize Results
After running a query, results appear in a table. Click Visualize to see options:- Line Chart: Trends over time
- Bar Chart: Comparisons across categories
- Pie Chart: Proportions
- Number Card: Single metric
- Table: Raw data
Part 6: Export Results as CSV
Click Export in the results panel. Formo downloads a CSV file with all rows. Use exported data for:- Reports to stakeholders
- Import into Excel for further analysis
- Feed into other tools (BI dashboards, email lists, etc.)
Part 7: Ask AI to Generate SQL
Don’t want to write SQL? Use Formo’s AI. Click Ask AI (chat bubble in sidebar). Describe what you want in plain English: “Show me users who completed 5+ swaps in the last 14 days and have net worth >$100k” Ask AI generates ClickHouse SQL automatically and runs it. You can refine with follow-up questions: “Sort by session count descending” “Export as CSV” See How to use Ask AI for details.Part 8: Connect BI Tools
Formo’s SQL engine integrates with external BI tools via the Query API. Supported tools:- Grafana
- Hex
- Metabase
- Superset
- Power BI
- Tableau
- In Metabase, click Settings > Databases > Add Database
- Choose “ClickHouse”
- Paste your Formo ClickHouse credentials (provided in workspace settings)
- Create queries and dashboards in Metabase that query your Formo data
Query on-chain data with Dune
The same editor can also query Dune (on-chain data) instead of Formo. Prefix a table withdune. and the query runs on Dune (Trino SQL); everything else runs on Formo (ClickHouse SQL).
A single query can’t mix Dune and Formo tables; they’re separate
databases. Use two charts on one dashboard to show both.
Best Practices
Click Schema Columns to Insert
In the left panel, click any column name and it auto-inserts into your query. Faster than typing.Use CTEs for Readability
Break complex queries into steps usingWITH clauses:
Use Autocomplete
Start typing a column name and press Ctrl+Space. Formo suggests matching columns.Save Query Results as Charts
After running a query, click Save as Chart. Add to a dashboard. The chart updates in real time with new data.Filter for Performance
Large queries over 1 year of data can slow down. Always addWHERE timestamp >= ... to limit the range.
FAQ
What SQL dialect does Formo use?
What SQL dialect does Formo use?
Formo uses ClickHouse SQL. It’s close to standard SQL but has some differences (e.g.,
arrayJoin for arrays, toDate() for timestamps). See ClickHouse docs for syntax details.Can I query data across multiple projects?
Can I query data across multiple projects?
No. Each project has its own isolated database. Write queries for one project at a time. If you need cross-project analysis, contact support.
What's the maximum query runtime?
What's the maximum query runtime?
Queries timeout after 30 seconds. Most queries finish in seconds. If yours is slow, add a
WHERE timestamp >= ... filter to reduce the dataset.Can I join events and users tables?
Can I join events and users tables?
Yes. Use standard SQL joins:
How do I query custom events?
How do I query custom events?
Custom events appear in the
events table with type = 'track' and the event name in the event column. Filter like: WHERE type = 'track' AND event = 'My Custom Event'.