Installation
There are several ways to install the Formo SDK:- Wagmi is recommended for EVM apps with wallet connection
- Solana for Solana apps using framework-kit
- HTML Snippet is recommended for static websites
- React & Next.js (without Wagmi)
- Angular for Angular apps using the bare EIP-1193 provider
Wagmi
If you’re already using Wagmi, this is the recommended way to install Formo for apps.When
wagmi options are provided, the SDK hooks directly into Wagmi’s state management instead of wrapping EIP-1193 providers. This provides:- Native event handling via Wagmi’s built-in state system
- Better compatibility with wallet connection libraries (RainbowKit, ConnectKit, etc.)
- Full tracking of signatures and transactions via TanStack Query’s mutation cache
HTML Snippet
Install this snippet at the<head> of your website:
React & Next.js (without Wagmi)
Use Wagmi for more reliable and secure event tracking.
Angular
FormoAnalyticsProvider and useFormo() are React-only. Angular apps import from the React-free @formo/analytics/core subpath and wrap FormoAnalytics.init() in an injectable service, with wallets connected over the bare EIP-1193 provider (window.ethereum). Full working example: with-angular.buffer polyfill. Angular’s esbuild build doesn’t auto-polyfill Node globals, but the SDK uses Buffer to decode signed-message payloads. Without it, signing throws ReferenceError: Buffer is not defined.
FormoAnalytics.init() in an injectable service. Import from @formo/analytics/core; the root entry pulls in the React provider, which Angular doesn’t need:
provideAppInitializer so the SDK’s autocapture wraps window.ethereum before any wallet interaction:
Identify users
Callidentify() after a user connects their wallet or signs in on your website or app:
- Wagmi
- Privy
- HTML Snippet
- Angular
Call
identify() in a useEffect that triggers when the wallet address changes:Track events
The Web SDK automatically captures common events such as page views and wallet events (connect, disconnect, signature, transaction, etc) with full attribution (referrer, UTM, referrals.) You do not need to manually track them.To track custom events (in-app user actions, key conversions) use the
track function with details of what happened:
Code examples
Privy
examples/with-privy
Dynamic
examples/with-dynamic
Turnkey
examples/with-turnkey
React
examples/with-react
Next.js (app router)
examples/with-next-app-router
Next.js (pages router)
examples/with-next-page-router
MetaMask SDK
examples/with-metamask
Thirdweb
examples/with-thirdweb
Reown
examples/with-reown
Crossmint
examples/with-crossmint
Openfort
examples/with-openfort
Angular
examples/with-angular
Solana
examples/with-solana
React Native
examples/with-react-native
Configuration
Local testing
The SDK skips tracking in localhost by default. To enable tracking locally during development, settracking to true:
Logging
Control the level of logs the SDK prints to the console with the following logLevel settings:logger.enabled: false); no logs print unless you explicitly set logger.enabled: true. The levels array is matched exactly, not hierarchically: setting levels: ["warn"] shows only warn messages, not warn and error together. List every level you want to see.
Autocapture
You can configure which wallet events are automatically captured by the SDK:Batching
To support high-performance environments, the SDK sends events in batches.flushAt and flushInterval configuration parameters.
Ready callback
Theready callback function executes once the Formo SDK is fully loaded and ready to use. This is useful for performing initialization tasks or calling SDK methods that require the SDK to be ready.
onload attribute:
Environments
You can control tracking behavior in different environments (test, staging) with thetracking option:
Excluding by timezone
When the visitor’s browser-resolved timezone (viaIntl.DateTimeFormat().resolvedOptions().timeZone) matches an entry in excludeTimezones, the SDK suppresses tracking entirely for that visitor.
No events are enqueued or sent, including identify and connect, and no identity cookie is written. This is useful for opting whole regions out of analytics (for example, to honor a jurisdiction’s privacy expectations).
Excluding query parameters
Formo automatically captures the page URL, query string, individual query-parameter properties, and the referrer. If your URLs carry sensitive data (auth tokens, one-time codes, emails), usetracking.excludeQueryParams to strip those parameters in the browser, before any event is sent so they are never transmitted or stored:
privy_oauth_code: Privy OAuth authorization codeprivy_oauth_state: Privy OAuth CSRF state tokenprivy_oauth_provider: Privy OAuth provider identifier
url, query, referrer, and other event properties. Matching is case-insensitive.
Consent management
The Formo Web SDK includes simplified consent management functionality to help you comply with privacy regulations like GDPR, CCPA, and ePrivacy Directive. Control user tracking preferences with simple opt-out and opt-in methods:Cross subdomain tracking
By default, Formo sets identity cookies on the root domain, sharing visitor identity across all subdomains. This ensures accurate visitor counts and consistent attribution across your subdomains out of the box.
With the default
crossSubdomainCookies setting:
- Cross subdomain tracking: track users as they move between your marketing site, app, docs, and other subdomains.
- Accurate attribution: attribute conversions to the correct channel, even when users cross subdomains.
- Automatic migration: the SDK migrates existing host-scoped cookies to the apex domain so visitors are not double-counted.
crossSubdomainCookies to false:
- HTML Snippet
- React / Next.js
- JavaScript
Referrals
Formo autodetectsref, referral, refcode, af, and referrer query parameters in the URL. You can customize how referrals are detected by the SDK:
- the
viaandrefquery parameters in the URL, and - from the
/referral/([^/]+)path pattern
Wagmi integration
For apps using Wagmi, enable native integration by providing the Wagmi config and QueryClient:- Hooks directly into Wagmi’s state management for connection events
- Uses TanStack Query’s mutation cache for signature and transaction tracking
- Skips EIP-1193 provider wrapping (no proxy behavior)
Solana integration
The Formo Web SDK supports Solana via framework-kit (@solana/client + @solana/react-hooks). The SDK subscribes to framework-kit’s zustand store as a read-only observer. It never wraps or intercepts wallet methods.
See the full Solana example app for a working implementation.
- React (Recommended)
- Without React
Wrap your app with Then use the
FormoAnalyticsProvider and pass client.store in the solana options. The SDK automatically tracks wallet connects, disconnects, account switches, and network changes.useFormo hook in any component:
Manually tracking Solana transactions and signatures
Transaction and signature events for Solana wallets must be tracked explicitly because framework-kit’s React hooks (
useSolTransfer, useSendTransaction, useTransactionPool) manage transaction state locally and don’t write to the store.
For Solana-only apps, set
evm: false to disable EVM provider detection (EIP-1193 / EIP-6963). This prevents unnecessary tracking of injected EVM wallets.FAQ
What is the difference between the Wagmi integration and the standard React integration?
What is the difference between the Wagmi integration and the standard React integration?
The Wagmi integration automatically tracks wallet connects, disconnects, chain switches, transactions, and signatures by hooking into Wagmi’s wallet adapter. The standard React integration tracks wallet events by wrapping the EIP-1193 wallet provider to track signatures and transactions. Use the Wagmi integration if your dApp uses Wagmi and its hooks.
How do I track custom events like swaps, deposits, or mints?
How do I track custom events like swaps, deposits, or mints?
Use formo.track() to send custom events with any properties you need. For example:
formo.track('Swap Completed', { pair: 'ETH/USDC', token_in: 'ETH', token_out: 'USDC', amount_in: 1.5 }). Custom events appear in the Activity feed and can be queried in the Explorer.Does the Formo SDK support consent management for GDPR?
Does the Formo SDK support consent management for GDPR?
Yes. The SDK provides built-in consent management with
optOutTracking() and optInTracking() methods. Call optOutTracking() to stop all tracking for a user, and optInTracking() to re-enable it. Formo does not use third-party cookies, IP addresses, or device fingerprinting, so most jurisdictions do not require a cookie consent banner.Can I use Formo with Privy or other embedded wallet providers?
Can I use Formo with Privy or other embedded wallet providers?
Yes. The SDK includes a dedicated Privy integration with
parsePrivyProperties() to extract profile properties and linked wallet addresses. For other wallet providers, use the standard React integration. If your wallet provider uses Wagmi under the hood (many do, including Privy), you can also use the Wagmi integration for automatic wallet event tracking.Proxy
To handle ad-blockers and privacy browsers, we recommend setting up a reverse proxy.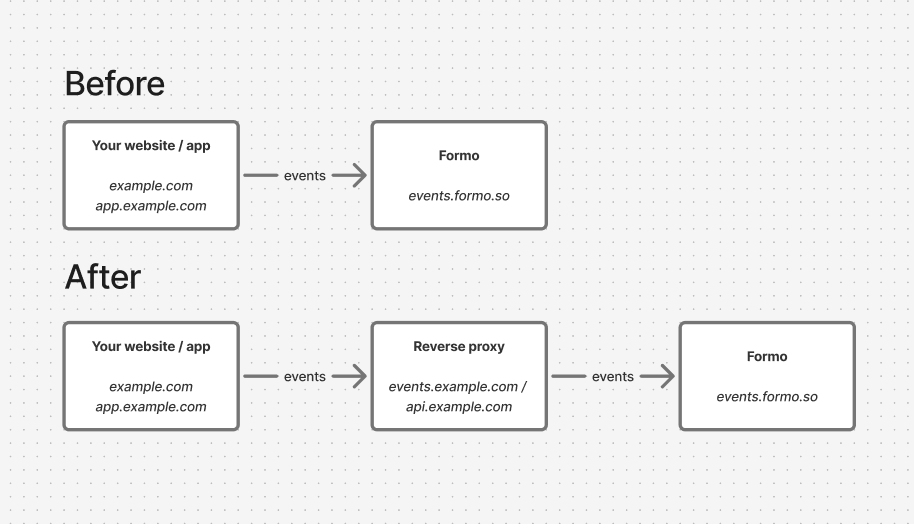
What happens under the hood when you forward the data to Formo via a reverse proxy
CDN
Some ad blockers block specific scripts and API calls based on the domain name and URL. To address this issue you can download and serve the Formo HTML Snippet fromcdn.formo.so to your own domain e.g. yourdomain.com/formo.js.
If you use the Web SDK, you can skip this because they are not loaded from the CDN.
Next.js rewrites
If you are using Next.js, you can take advantage of rewrites to behave like a reverse proxy. To do so, add arewrites() function to your next.config.js file:
apiHost parameter in the Formo SDK:
See an example Next.js app here.If you are using the HTML / website snippet, replace the install script to:
Next.js middleware
If you are using Next.js and rewrites aren’t working for you, you can write custom middleware to proxy requests to Formo. Create a file namedmiddleware.js/ts in your base directory (same level as the app folder).
Others
Alternatively, you can set up your own proxy (with Cloudfront, Cloudflare, etc) and pass the URL as the SDKapiHost:
Verification
To verify the proxy is working:- Visit your website / app
- Open the network tab in your browser’s developer tools
- Check that analytics requests are going through your domain instead of
events.formo.so - Check that events show up in the Activity page on the Formo dashboard